Showing posts with label Recipe. Show all posts
Showing posts with label Recipe. Show all posts
This 20-minute pizza mission started when I saw it in my FB newsfeed a few days ago. A friend from high school, Intan Zubaidah, posted about it and I made a mental note to try it during the weekend. So, it is weekend. And I kept my word.
Pizza without having to knead the dough and without having to use the oven. You just need a pan with a lid and a stove. How cool is that...
These are the ingredients. And the instructions on heating the pan. Hubby had to stop by the grocery store just to buy the self-raising flour. He he...

Put the dough ingredients in the pan (flour, water, salt, dry yeast and honey). Mix and spread the dough in the pan.

Spread chili sauce and add on the fillings. Top up with cheese. I also sprinkled oregano and black pepper powder.

Put the pan on the stove with the lid on.

The instructions said medium heat for 5 minutes. Then adjust the lid to let the steam out. Turn the heat to medium low and cook for another 10 minutes.
A bit tricky with the heat actually. My first try was not quite successful. The bottom was quite burned but the top part was still edible. So I just had to try again. Second try was not bad. The kids makan sampai abis. Pardon the messy presentation.

Tried and tested. The recipe works...:)
The video of this stovetop pizza can be viewed at Intan's blog page. I wonder whether we can just pop the pizza into the oven using the same no-kneading recipe...


This is a recipe sharing entry again. While I'm at it, I'm sharing 2 recipes in this entry. Bread pudding and steamed moist choc cake. I got the recipes from the net.
Recipe 1: Bread pudding
6-7 pieces of bread
Butter
650 ml fresh milk/evaporated milk
3 eggs
Sugar (agak-agak dalam 6-7 sudu)
1 table spoon of vanilla essence
Pre heat the oven (170 degree Celsius).
Prep the baking tin. Spread butter evenly on the bottom and the sides of the baking tin.
Spread butter on the bread. Cut each bread into 4 pieces.
Placed the cut bread into the baking tin.
In another container, beat sugar and egg until the sugar is dissolved. Add in milk and vanilla essence.
Pour the milk mixture on top of bread.
Put aside to allow the bread to absorb the milk mixture.
Bake for 30 minutes.
Vanilla sauce (to go along with the bread pudding)
300 ml evaporated milk
8-10 table spoons of sugar (ikut sesedap rasa)
Corn flour (pre-mixed with water)
2 egg yolks (placed in a separate bowl)
Vanilla essence
Simmer milk and sugar in a pot.
Add in corn flour (letak sikit je, if not, pekat sangat)
Scoop a ladle full of the milk mixture and add into the bowl containing the egg yolks. Mix thoroughly.
Pour the egg yolks mixture into the pot. Add in vanilla essence and mix.
The mixture is prone to lumpiness so for better results, sift the mixture.
Sorry, no pic. I remembered taking a pic of the bread pudding but that was aeons ago. Now could not find the pic. I may have accidentally deleted the pic.
Recipe 2: Steamed moist chocolate cake
250 gm butter
1 cup castor sugar
1 cup brown sugar
4 eggs
1 teaspoon of vanilla essence
1 cup warm fresh milk
1 1/4 cup self-raising flour
3/4 cup cocoa powder
Grease a baking tin with butter and flour.
Heat steamer on a stove.
Sift flour with cocoa powder.
Beat butter with castor sugar and brown sugar until fluffy.
Add in vanilla essence and mix.
Add in eggs one at a time and mix again.
Add in milk and flour alternately and mix thoroughly.
Pir the batter into the baking tin and cover with aluminium foil.
Steam for 1 1/2 hours.
Once cooked, let it cool on a plate before decorating it with chocolate ganache.
How to make chocolate ganache:
150 gm cooking chocolate
1 table spoon condensed milk
1/4 cup hot water
1 table spoon butter
Cut the cooking chocolate into small pieces and put them into a bowl together with condensed milk and war water. Heat the mixture the double boiler way. Turn off the stove and add in butter. Stir until the butter melt.. Pour the chocolate mixture onto the cake and decorate ikut kreativiti masing-masing.
This is the outcome. Very the comots.

I had enough batter to make these too.

Sedap kalau dah disejukkan dalam peti ais.
The bread pudding is my eldest's favorite. Once, while having the bread pudding, she mentioned, 'Kenapa mak tak masuk Masterchef Malaysia? Kalau masuk, mesti menang.' Ha ha... first round pun tak lepas kot. Anyhow, to be the Masterchef for my kids is good enough for me. :)
Ever since I saw pics of apam polka dot that people uploaded in FB, I have been intrigued and teringin nak buat. So, I surfed the net for its recipe. Most sites displayed the same recipe so credit to all the sites that posted a recipe that works.
Here's the recipe:
275 gm wheat flour.
I translated this to 3 cups of flour. Sebab tak kuasa nak keluarkan weighing scale dari dalam almari setiap kali nak buat. The cup which I used is this Claytan cup. So, may not be the same size as your cup.

220 gm castor sugar.
Using the same cup, it's 11/4 cup.
180 ml fresh milk.
If you don't have a measuring cup, you can always use your child's feeding bottle or drinking cup. That's what I did.
3 eggs.
The sites that I refer to mentioned that the eggs should be the one chilled in the fridge. The reason? I have no idea. Follow je la.
The sites that I refer to mentioned that the eggs should be the one chilled in the fridge. The reason? I have no idea. Follow je la.
3 teaspoons of baking powder.
1 tablespoon of ovalette.
Few drops of vanilla essence.
Filling.
These are my options. Nutella for filling eh? My kids love anything chocolatey.

Food colouring.
Ikut suka nak kaler apa.
Here's how to do the apam:
Mix flour, sugar, eggs, baking powder, ovalette, milk and vanila essence in a bowl using a mixer, at maximum speed, until fluffy.
Divide the batter into few portions (number of portions depend on the number of colours you have).
Add in a few drops of colour in the batter.
These are the colours that I have. Nice eh... Feels like in an art class.

Using a piping bag, pipe the batter into paper cups/mould until half full.
Since I don't have piping bag, I use these plastic bags nipped at one corner.

But if things got too messy, just spoon the batter into the paper cups/mould.
Put in the filling and pipe in the batter until full.
Then do the dots. Since my hand-made plastic bags-cum piping bag were a little bit out of control, I resorted to the use of syringe instead.


Finally, steam for 10-15 minutes.
Note:
The choice of what color to use for the apam and its dots is entirely up to you.
And of course, not necessarily dots. I saw pictures of apams with smiley faces and names written on them.
I still need to look for the perfect filling. The Nutella sank to the bottom instead of staying put in the middle of the apam.
Some sites that I refer to gave these tips: When steaming the apam, use medium heat. Or else the apam will crack and ternganga. I have a few yang ternganga macam tu. Sungguh tak comel. And also wrap the cover of the steamer with cloth to prevent the evaporated water to drip back onto the apam.
Here's the end product. In terms of looks, hodoh la jugak. Ha ha... But in terms of taste, not bad. The kids love it. Dah bawak pergi sekolah and their friends like it. Dah siap pesan suruh buat lagi...

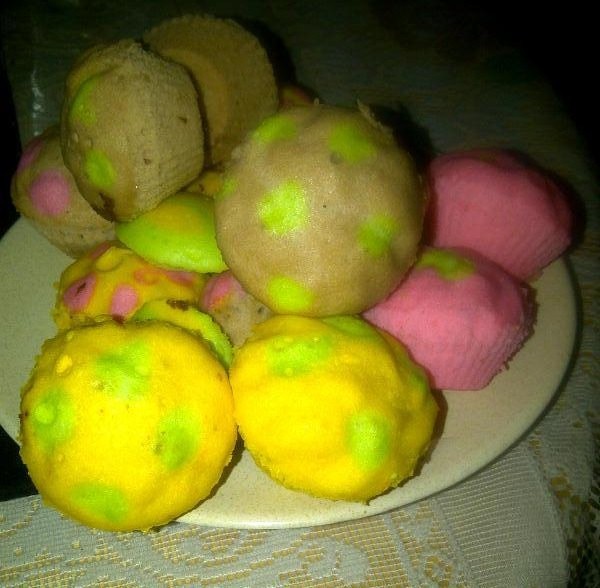
Update 7 May 2012:
I have since improve on the techniques. I used paper cups and acuan kuih lompang. Put the paper cups in the acuan and piped the batter inside. Then steam. Better looking. :)
WE BAKED.
Strawberry Jam Muffin. A recipe I got from the net with slight modifications. I purposely searched for a recipe with strawberry jam since I had an unopened jar of strawberry jam bought during our trip to Cameron Highlands months ago. Mujur tak expired lagi.
The recipe:
2 cups all-purpose flour
1 tablespoon baking powder
4 tablespoons granulated sugar
1 teaspoon salt
1 large egg
1 cup fresh milk
100 g butter
Vanilla essence
Strawberry jam
Sift together flour, baking powder, sugar and salt into a bowl. Set aside.
In a small bowl, combine together egg, milk and butter. Add egg mixture at once to dry ingredients. Add in vanilla essence. Stir mixture well.
Spoon the mixture into cupcake liners, filling one-third of the liners.
Using a spoon, drop strawberry jam into the center.
Spoon the flour mixture until 2/3 full, covering the strawberry filling.
Bake in the oven for 15-20 minutes.
Junior chefs hard at work.

The outcome.

The taste: the kids love it. For me, ntah la, muak pun ada jugak. Overdose of butter maybe. My youngest avoided the strawberry center so she ate the top part and gave it to me to lick the filling and she would consume the rest. Isyh... macam-macam...
WE DINED OUT
That night we had dinner at Rasa Rasa Satay outlet, located in Taman Sri Gombak.

I had this kungfu noodle. Boleh la...

The kids had fried kue teow. One with prawns.


I ended up exchanging my dish with one of the kids. She thought mine was more appetizing. I supposed I was already full because I don't really like the kuey teow taste.
Hubby had mee hoon Singapore. He said, boleh tahan.

We also tried the satay. Kuah dia kurang ummpphh..

In terms of service, the place need improvement. We had our dishes mistakenly sent to another table and other people's food got sent to us instead.
Earlier that day, I cooked lunch. We had fried chili crab which the kids love. And guess who had to crack the shell and extract the crab's meat for them to eat? After all, a mother's work never halt even on Mother's Day.
The kids had been bugging me for home-made chocolate ice-blended. After buying some time with excuses like "Nanti mak buat" or "Ok, nanti ya..." or "Hari ni tak sempat la..." I finally granted their request.
5 table spoons of Milo
2 cups of chocolate milk
2 cups of ice cubes (or was it 3 cups?? Try and error je la ya..)
Blend the above together. (Enough for 4 glasses, just nice for my 4 kids)
Pour the blended mixture into a glass. (Note: the above ingredients were enough for 4 glasses)
Squeeze a generous amount of whipped cream on top.
And sprinkle some colored rice candy.
Walla!!

Got this ice-cream recipe from the net. Simple and the kids love it.
1. 2 cups of coffee-mate
2. 200 ml fresh milk
3. 1/2 cup sugar
4. Chocolate emulco flavour
The how:
Beat items no 1 - 3 until well-mixed.

Keep in the freezer for 1 1/2 hour.
Take the ice cream out and beat again (at least 10 minutes). This step is quite important. If not, the ice-cream will not be soft and akan jadi liat macam tanah liat. Believe me...
See...one mixer ada berapa tangan yang pegang... This is teamwork .
.
Freeze again. At least 8 hours.
Can simply freeze in a container or use ice-cream mould like this one.

Slurrrppp.... yummy...

*Note: Can also substitute fresh milk with chocolate flavoured milk. And thus no need for chocolate emulco.
This is one of the few dishes that I can cook. It's quite simple. A school mate did mention some time ago that we actually learn this dish in our Home Science subject in secondary school many years ago. But how come I did not have any recollection whatsoever of cooking this dish during school time? Takkan ponteng kot... Even though I admit that I didn't have the passion for the subject then, but I wasn't a kaki ponteng...err... true most of the time...
Anyhow, I learn to master (master ke...??) this dish when I'm already married. Too late?? Better late than never. Lagipun bila dah pandai buat, mula la rasa yg beli punya kurang uummph... (waahhh.... berlagak giler... ). And the most important thing, my other half likes to eat it. Kids too.. Initially, my kids jual mahal. Tak nak makan. Then, they had their first dose, lepas tu, sekali ambik, 2, 3 ketul sekali... (waahh.... masuk bakul angkat sendiri lagi sekali..)
Ok, back to the point...
The recipe can be obtained from various sources. I'm sure on the net itself dah bersepah-sepah. And I'm no exception. I browsed thru the net too to learn.
The ingredients (batter):
Wheat flour
Coconut milk
Eggs
Salt
Yellow colouring
Water
The how (batter):
Mix all the ingredient and put in the blender and trrr.... away.
Note: The same batter ingredients can be used to make roti jala. Another dish that my kids love.
The ingredients (filling):
Mix all the ingredient and put in the blender and trrr.... away.
Note: The same batter ingredients can be used to make roti jala. Another dish that my kids love.
The ingredients (filling):
Minced beef (sometimes I'm terlebih rajin, so I mince the meat myself. Easier way, buy the ready-minced one)
Garlic, shallot and dried chillies (blend)
Curry powder
Salt and sugar (secukup rasa)
The how (filling):
Saute the blended ingredients in a frying pan. Add in curry powder which has been dissolved in water. Add in meat, salt and sugar. Add in the chopped onions. Simmer for a while until the meat is well done. Then put it aside.
For decorations:
Chopped spring onions and red chillies
Fried shallots
Really sorry I can't give the exact measurements of each ingredient coz I selalu campak2 je... err... of course I'm exaggerating. But seriously, I simply add in the ingredient sesuka hati, and then observe the texture. Agak2 cair sangat, boh lagi tepung. Agak2 kurang lemak, boh lagi santan. And that's why I don't have the consistency in my cooking. Today's Kuih Cara Berlauk may taste differently from last week's Kuih Cara Berlauk. Sometimes it tasted heavenly.., sometimes it tasted hampehly.. ! I advise you to refer to other sources for the complete recipe.
Now you have the batter and the filling ready, this is how to make the kuih itself.

You need to have a mould like the one in the pic. Put the mould on the stove. Since the mould's bottom is not flat you need to have some sort of support (please refer to the pic). Tak reti pulak aku nak explain that thing yg boleh jadi alas tu. Let's call it alas periuk. Once the mould is safely perched on the stove, ignite the fire, glaze some oil on each one of the mould's spaces? cavities? holes?.. whatever la kann.. Usually, one mould has 6 of those. My mother-in-law usually use daun pandan and dip the leaf in oil and glaze the mould so there will be an extra nice aroma of daun pandan. But me, the malas version, will glaze the mould with anything that I can get hold on to. Kalau sudu, sudu la.
Next, once the mould is heated enough, pour the batter mixture into the mould's spaces. I use a jug, easy to pour. But caution, not too full or overflow coz you'll be putting the meat filling next. If too full, the batter mixture will overflow and it won't be Kuih Cara Berlauk anymore but Kuih Tak Cara Berlauk.. . 3/4 full is just nice.
Once the mould is filled with the batter, put in the meat filling. Err... see, mine almost overflowed... Sometimes I do cakap tak serupa bikin . Anyhow, I loveee to put a lot of the filling. Lagi banyak, lagi best. Usually, those which are on sale, kedekut lauk (Kuih Cara Sikit Lauk). Oh yes... almost forgot, all this while, maintain a low fire eh.. if not, tak sempat nak bubuh semua inti, the bottom part of the kuih will be burnt and rentung and hangit...
. Anyhow, I loveee to put a lot of the filling. Lagi banyak, lagi best. Usually, those which are on sale, kedekut lauk (Kuih Cara Sikit Lauk). Oh yes... almost forgot, all this while, maintain a low fire eh.. if not, tak sempat nak bubuh semua inti, the bottom part of the kuih will be burnt and rentung and hangit...
Next, add in the decorations. Spring onions, red chillies and fried shallots. I usually skip the chillies and fried shallots coz my kids will excavate 'em and throw 'em away. Better not put it and save my energy from chopping those things


Then, cover the mould with a lid. Whatever lid can do. Janji tutup so that the kuih is well-cooked.
 Next, take out the kuih from the mould. It shouldn't be sticking to the mould. If sticky, may be it is not well cooked or the batter too watery or the mould is not well-oiled. Agaknya la... Me no Chef Wan...
Repeat the above process until you have finished the batter. And if you ran out of filling and still has the batter, not to worry. Do the same as above, but instead of beef filling, can put in sugar. Jadi la Kuih Cara. Just as yummy. Well, of course the color is wrong la. Kalau Kuih Cara kan green kaler.

Now, serve and Bismillah... makan...


